SeekHealth
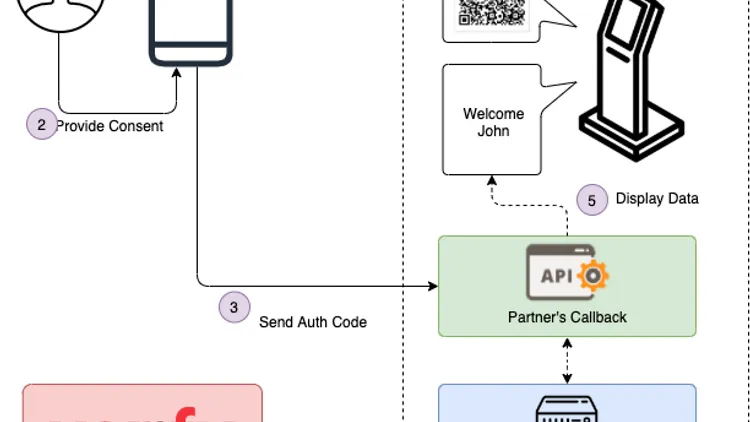
This software project focuses on developing a microservice solution tailored for the healthcare sector. The primary users of this system are pharmacists, doctors, and patients, with the main objective being the seamless management of appointments and medication dispensing. The platform empowers patients to create appointments, which are then scheduled by doctors. To ensure secure access, the project leverages the Singpass API for verification purposes, ensuring that only authorized individuals can interact with the system. Additionally, an AMQP service is implemented to listen for errors and logs, enabling efficient monitoring and issue resolution. The use of Docker allows for containerization, enhancing scalability and deployment flexibility. To validate and test the system’s endpoints, Postman is employed as a reliable testing tool. By integrating these technologies and functionalities, the software project strives to revolutionize healthcare services and streamline communication between pharmacists, doctors, and patients.
SeekHealth is our effort to allow healthcare providers to aggregate thousands of appointments and consultation information. The SeekHealth API allows healthcare providers to bring features for both their internal and external users.
0. Direct Links to Resources
- SeekHealth API Documentation: https://documenter.getpostman.com/view/12748512/TzCQcnSk
- SG Verify Demo App: https://github.com/ndi-trusted-data/sg-verify-demo-app
- SingPass Verify API: https://api.singpass.gov.sg/library/verify/developers/overview
- Flask Login Documentation: https://flask-login.readthedocs.io/en/latest/
- WTForms Documentations: https://wtforms.readthedocs.io/en/2.3.x/
1. Prerequisites
1.1 Installation
Please ensure that you have the following installed on your machine. You can follow this installation guide.
-
Python 3
-
Visual Studio Code
-
Docker Desktop
-
WAMP Server
-
Google Chrome
-
Google Chrome Extension Installed with Allow CORS: Access-Control-Allow-Origin (https://chrome.google.com/webstore/detail/allow-cors-access-control/lhobafahddgcelffkeicbaginigeejlf/related?hl=en)
1.2 Launch
Make sure that your WAMP Server and Docker is running. Please ensure that the default port of MYSQL is 3306. Change the port number by Right Click WAMP Icon -> Tools-> under port use by MySQL-> use a port Other than XXXX. WAMP will be restarted.
2. Database
For Windows :
-
Start WAMP server.
-
Go to phpMyAdmin and log in.
Username: root
Password:
-
Import the sql statements in the following order under the database folder
-
g1t6_patient
-
g1t6_doctor
-
g1t6_appt
- if values are not added, please copy the SQL statements from the database folder into appointment schema.
-
g1t6_prescription
-
g1t6_employee
-
3. Postman
Open Postman App and import ESD_G9T2.postman_collection.json. Run the requests to test the endpoints. Alternatively, you can access SeekHealth’s API through our public Postman documentation.
4. Docker
-
Build the docker images.
cd executables docker-compose up -d -
Please check that all the images and containers are running using
docker imagesanddocker psin your command prompt. Usingdocker images, you should see the following images with tagg1t6.Login
- borenlew/login_log:g1t6_v2
- borenlew/patientlogin:g1t6_v2
- borenlew/employeelogin:g1t6_v2
- borenlew/singpass:g1t6_v2
Complex Microservices
- jthm/consultationinfo:g1t6
- borenlew/bookingappt:g1t6_v2
Simple Microservices
- jthm/patient:g1t6
- jthm/prescription:g1t6
- jthm/appt:g1t6_v3
- borenlew/doctor:g1t6_v2
RabbitMQ
- rabbitmq:3-management
5. User Scenarios
We have a total of 8 scenarios across 3 user interfaces (UI). You can refer to the walkthrough under “recorded scenarios” folder.
5.1 Patient UI
5.1.1 Sign In / Sign Up
Create a SeekHealth account through http://localhost:5800/signup. SingPass Verification will be done through http://localhost:3003.
If you are already a SeekHealth user, sign in through http://localhost:5800/login.
- Username: tanxiaohui98
- Password: tanxiaohui98
Login_Log.py is listening as an AMQP service and error logs would be recorded in the event of unrecognized credentials to login.
5.1.2 Create an appointment
Click on MAKE AN APPOINTMENT button.
Select the following options under dropdown list.
- Department: Cardiologists
- Doctor: Tommy
- Timeslot: Thu, 15 Jul 2021 03:30:00 GMT
Click on MAKE AN APPOINTMENT button and a popup confirmation can be seen.
5.1.3 View
Under the navigation bar, Upcoming Appointment allows you to view all your scheduled appointment and Doctors allow you to view all the available timeslots for you to book future appointments.
5.1.4 Log Out
Click on the Log Out tab under the navigation bar so that the session can end.
5.2 Doctor UI
5.2.1 Sign In
Sign In through http://localhost:5900/login.
- Username: tommy123
- Password: tommy123
Please select doctor as the role.
5.2.2 View all scheduled appointments and patient’s details
Once signed in, all scheduled appointments can be seen.
Before the medical consultation, you can view the patient’s details by clicking on View Patient Details button.
5.2.3 Create consultation information
During the medical consultation, a new consultation detail can be added via the Add Consultation Details button. The patient is diagnosed with the following symptoms.
- Diagnosis: dry cough, shortness of breath, fever
- Medicine Name: ibuprofen
- Dosage: 200mg
After the consultation, click on the Add button and a confirmation can be seen.
5.2.4 Log Out
End the session via http://localhost:5900/logout.
5.3 Pharmacist
5.3.1 Sign In
Sign in through http://localhost:5900/login.
- Username: liying123
- Password: liying123
Please select pharmacist as the role.
5.3.2 View all medical prescriptions
When preparing the medication, you can search for the prescription via patient ID.
5.3.3 Log Out
End the session via http://localhost:5900/logout.